Email marketing is one of the best ways to monetize your website. As a business owner, the last thing you want when sending emails to clients is for them to get marked as spam. Scammers and spammers have forces email service providers like Gmail and Yahoo to crack down on spam hard. While this is generally a good thing, oftentimes a non-spammy email can inadvertently get labeled as such.
Therefore, a series of standards have been put in place to help these email service providers authenticate the source of an email. SPF, or Sender Policy Framework, is one such standard. DKIM, or DomainKeys Identified Mail, is another. Setting up SPF and DKIM authentication on your website enables you to verify that your website is authorized to send emails.
Let’s talk about how to setup SPF and DKIM for your website which is a huge step you can take to keep your sent emails out of your client’s spam folders.
What is an SPF Record
Once again, SPF stands for Sender Policy Framework. Creating a record of this for your website via your hosting provider essentially informs Gmail, Yahoo, etc. that your website is allowed to send emails.
Without this record, you can understand why your emails might be finding their way into your client’s spam folders. Someone’s Gmail account gets an email from your domain, and Gmail does a quick check to see that your domain has no SPF record.
In this case Gmail might say, “this domain has no authorization to send emails from it, so this email could likely be from a scammer.” and it gets flagged.
It’s also a slippery slope. The more emails from a domain which find their way into the spam folders of Gmail accounts, the more likely any email you send to a Gmail recipient will be marked as such.
If you are sending emails from your domain, meaning you have an email address tied to your domain which you use, you absolutely need to setup an SPF record.
What is a DKIM Record
Similar to the SPF record, a DomainKeys Identified Mail or DKIM record also is used to prevent spoofing.
This attached an encrypted digital signature to emails you send so that they can be verified on your recipient’s end.
This means that scammers trying to send emails which appear to be from your website have a much harder time as they can’t offer the same verification on their emails as you can.
Gmail, Yahoo, etc. can scan their emails and see that they’ve been modified in some way/aren’t legitimate from your site when you have DKIM enabled.
This is why it’s so essential to set up both SPF and DKIM: to thwart the efforts of scammers trying to use your domain and improve your own inbox delivery rate.
How to Setup SPF and DKIM
The easiest way for how to setup SPF and DKIM is to use your cPanel portal from your hosting provider.
cPanel is a relatively user friendly software designed to let you interact with everything on the backend of your websites.
This includes creating both an SPF and DKIM record for your website.
In the older (meaning a few years ago) days, it was much more complicated to set up SPF and DKIM. Now there’s a specific Email Deliverability link in your cPanel to automatically generate and enable SPF and DKIM if it’s not already on.
Step 1 – Log Into Your cPanel and Click “Email Deliverability”
The first thing to do is log into your cPanel using the link your hosting provider gave you and ID and password you set up.
Once in, you can navigate to the “Email” section or just search for “Email” in the top search bar. This will filter out non-email related apps and you’ll find “Email Deliverability”.

Click on this to see the status of email deliverability for your various domains on that hosting account.
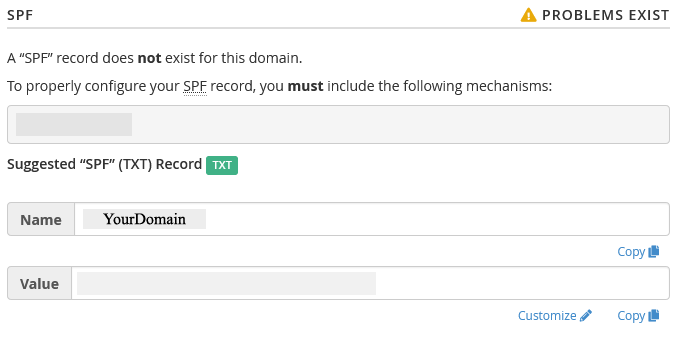
Step 2 – Find Any Domains Which Say “Problems Exist” and Click “Manage” or “Repair”
Look for any yellow in the columns which say “Problems Exist”:

The text will specify what the exact issue is. You’ll see options to click “Repair” or “Manage” to the right.
First try clicking “Repair” as this typically resolves the issue, creating whichever records are needed.
Step 3 – Click “Install the Suggested Record”
If you clicked on “Manage” in the last step, you’ll see the SPF and DKIM record areas separated so that you can individually fix each one.
Under to the record you want to fix, click on the “Install the Suggested Record”:
If you do this on the DKIM record, you’ll get an additional warning message that you need to use this key if you send email from another server:
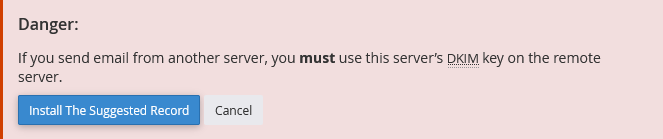
We’ll talk about this next.
Step 4 – Verify/Authenticate With Email Marketing Software
This is an additional step which only applies if you send emails from a third party, ie email marketing software.
In my case, I send emails to clients directly using my website’s email protal, but I also use MailChimp to send email blasts, automated email series/funnels, etc.
If you do this, you need to both verify and authenticate your domain with whichever email marketing software provider you use.
I’ll be showing the process with MailChimp, though it’s not too dissimilar no matter who you use.
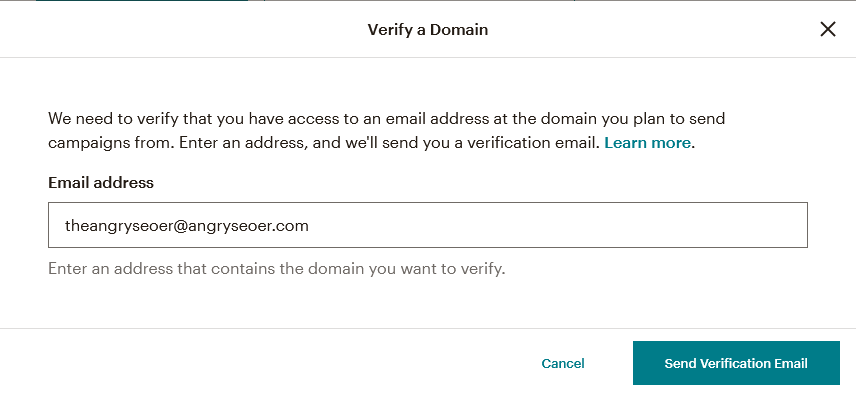
First, navigate to the “Domains” section in the sidebar and click “Add/Verify Domain”.
This will prompt you to enter a valid email address associated with that domain which it can send an email with an verification link to:
Click the link in the verification email they send and you’ll verify that you have access to email for that domain:

Lastly, click “Start Authentication”. You’ll be given information to make a CNAME record back in the “Zone Editor” section of cPanel.
Select the domain you want to make the record for/you want to send emails for. Click “Add Record” and create it using the information MailChimp has given you to create the CNAME record.
Now back in MailChimp, click “Start Authentication” and if you’ve done it right, it should display as below:

Give a few minutes to detect the record if it doesn’t work right away.
And there you have it, how to setup SPF and DKIM so your emails avoid the spam folder and to crack down on scammers using your domain name in their emails.
Pingback: How to Setup DMARC (cPanel) to Improve Email Performance - Angry SEOer