Whether you’ve decided to transfer your web hosting from one company to another due to financial reasons, a drop in the quality with your existing host, etc. it’s thankfully not a difficult process. I’ve put together this step by step guide on how to transfer web hosting from one company to another so you can make the switch without a second of downtime.
How to Transfer Web Hosting From One Company to Another
Let’s go through the full process, including all the small easy to forget things you need to do, step by step.
Step 1 – Purchase a New Hosting Plan
Obviously before we can transfer our web hosting from one host to another, we need a new host to migrate our site or sites to. OBVIOUSLY let your existing hosting lapse before you have a new host. Specifically I recommend making this switch a week or so before your existing host term ends at the latest.
If any issues arise, you’ll still have everything intact (files, database, etc.) with the old host so you can adjust on the new host accordingly.
There are plenty of good hosts out there. I currently have sites being hosted via HostGator, InMotion Hosting, and CrocWeb so I can actively recommend all three.
Step 2 – Backup and Download Website’s Files and Database From Existing Host
We now need to grab all of the files (HTML, CSS, PHP, image uploads, etc.) which make up our existing site. If your website utilizes a content management system like WordPress to run it, you’ll also need to export its database. This is where the content for your posts, pages, meta information, etc. is all kept.
Nearly every popular hosting company offers some version of cPanel which features the same tools for managing the backend of your site.
The two tools we want to use here are “File Manager” and “phpMyAdmin” to download the website files and database, respectively.
First, open File Manager on your old host, find the website you want to move, and right click on its root folder and select “Compress”:
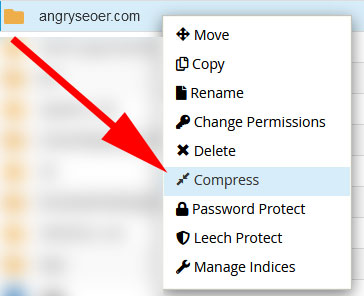
It will prompt you to select a type of file compression, name, and location for the compressed file. The default format type, name, and location is fine. In my case, this creates a zip compressed format file of my entire Angry SEOer website. Every file of my site is contained in that.
Click “Reload” if you don’t see this compressed file, then locate and select it, and click “Download” at the top. This will download your entire site to your hard drive in one convenient to move folder.
Now we just need the database.
Back in cPanel, open “phpMyAdmin”.
On the left, you’ll see a list of any and all of your databases. Simply click on the database for the site you want to migrate to the new host.
This will open all of the many tables which make it up on the right. These tables are where your posts, pages, categories, plugin settings in some cases, etc. are stored.
It can look overwhelming if you’re not familiar with databases or SQL, but fortunately all we need to do is click “Export” at the top.
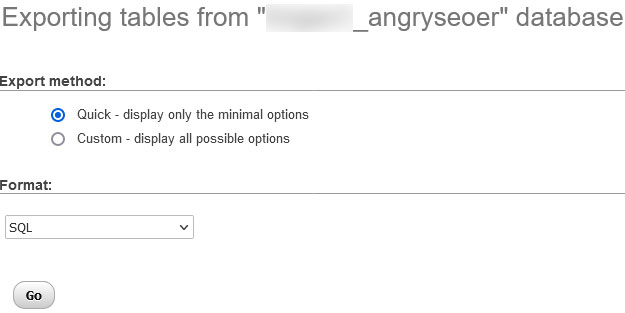
This automatically downloads every table which makes up your database into one convenient file.
Step 3 – Lay Groundwork for Site on New Host
We’re roughly halfway there, though there’s a bit more work involved on the new host to get your site going properly.
You should now have two key files: a compressed folder of all the files of your site, and a .sql file containing your site’s entire database.
Before we can upload and/or import these files on to our new host, we need to lay a bit of groundwork, all done in the cPanel of your new host.
First, find and select “Addon Domains” in your new host’s cPanel and enter your site’s URL:
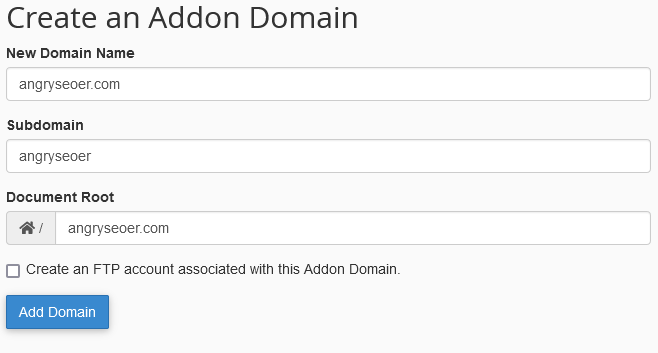
This creates a folder in the “File Manager” tool of your new host’s cPanel for your website.
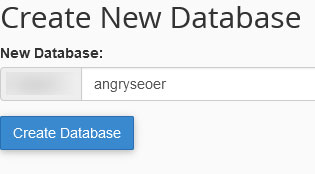
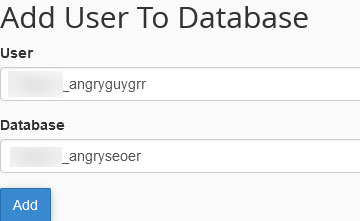
Now let’s move on to getting the database on your new host, which requires us to create a database on the new host.
To do this, select “MySQL Databases” from cPanel and create a new database, using the same name as the last one:
Note that the prefix for the database is locked in and is unique to your host. This means that technically the overall name of the database is different than it was on our last host, so we’ll need to make a short adjustment in a second to reflect that and ensure everything works.
We need to create a username:
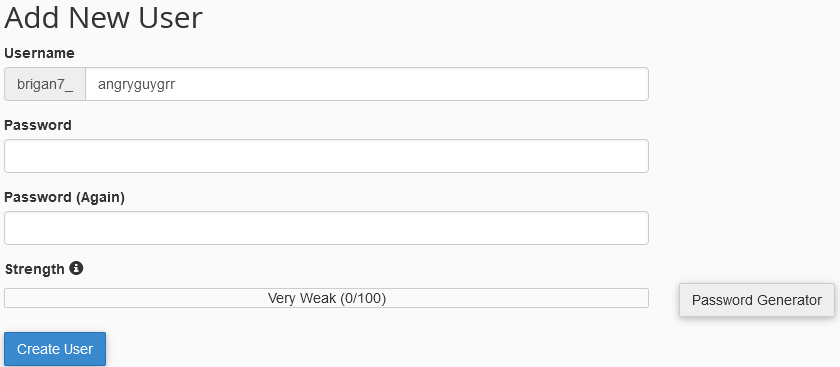
… and grant that username access to that database:
Make sure to grant them all the privileges when prompted.
Now we should have the database name, the username which has access to that database, and that username’s password all written down. Write them down if you haven’t already as we’ll need them soon.
Step 4 – Move Files and Database Tables to New Host
Now that we’ve done all that groundwork, we can do the satisfying part of moving our stuff to the new host.
First, let’s move the files/folder via that compressed folder we downloaded in Step 2.
Open File Manager and open the new folder for your domain which we created in Step 3 via the Addon Domains part. This folder should be empty in your file manager.
Click “Upload” and select the compressed file which contains the files for your website from the old host. Depending on size and speed, this might take 30 seconds or so.
Click “Reload” if you don’t see the compressed folder, then select it and click “Extract” at the top of the page choose the top level of the domain as the destination. This will take a few seconds at least to unpack all of your website’s files and folders into the domain folder on your new host.
Now let’s move the tables of our old database to our new database.
Open “phpMyAdmin” on your new host and find and click on the new database you created in Step 3.
It should be empty on the right, so let’s fix that.
Click “Import” at the top, click “Browse”, and select the .sql file we created in Step 2:
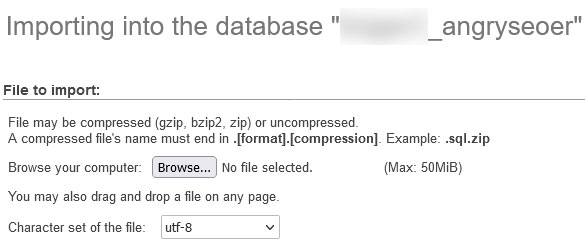
The default options on the page should be fine, so scroll to the bottom and select “Go”.
This might take a minute or so depending on the size of your database. When it’s finished, you should see all of the various tables of your old database assembled in your new database.
Step 5 – Update Config File(s)
I alluded to this earlier, but there is one difference in the names of your database and username on your new host: the host specific prefix.
The config file(s) that we uploaded in File Manager on our new host will reflect the old database name, which means our site’s files and folders won’t successfully make the connection to the new database name as is, and so the site won’t work.
Therefore, we need to make a quick adjustment to this file via “File Manager” on our new host.
Open File Manager once again and open your site’s folder.
If your site is running WordPress, the file we need to adjust is called “wp-config” and should be in the root of your domain’s folder:
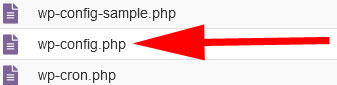
Click on it and select “edit” at the top of the page in File Manager.
This opens up a text editor. You’ll see just a few lines down where your database name, the username which has access to it, and its password are located:
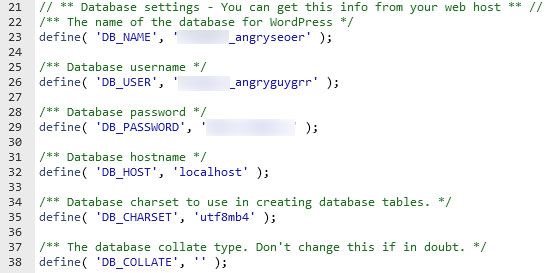
Now simply replace what it has between the quote lines for each of the sections pictured above using the database information you used in Step 3.
Step 6 – Loose Ends
I call this step loose ends, as it’s just a few small things to check or consider before the next and final step. Let’s cover each one briefly:
Email Accounts – If you have an email account associated with your domain and you access your email through your host, you’ll need to create that same email address on your new host. This is easy to do, simply navigate to “Email Accounts” in cPanel and create a new one using the same name@yourdomain. You can even use the same password to make things easier. Once we do the next and final step, all emails will now instead get directed to the new host. Make sure you check out my post on how to setup SPF and DKIM to make sure that your emails from that address are verified as coming from your domain.
PHP Version – I recommend setting the PHP Version associated with your website as the same as it was on your last host to avoid any issues. The various configuration files associated with your website which we migrated in an earlier step CAN adapt to a different PHP version, but in my experience it’s safer to first inherit the same version, then adjust it after you verified that the site works on your new host. You can check and change the PHP Version of any website on your hosting account in cPanel via “Select PHP Version” or “MultiPHP Manager” (it varies between different hosts’ versions of cPanel).
Final Step – Update Name Servers
The last thing to do is to tell your domain registrar for that website that the website is being hosted on a new service.
Once we make this change, the site will load from the new host when you try accessing it in your browser.
As such, make sure that you’ve completed all of the other steps, otherwise the site won’t load and no one will be able to access your site.
To do this, simply go into the account for the domain registrar your site is registered with and input the nameservers your new host gave you.

Typically this information is included in their welcome email or can be found in your cPanel with them.
Once you put the new namservers in, save or update the page. At this point (although it will tell you it can take up to several hours), web browsers will begin pointing any traffic your website receives to its new home on your new host.
If everything went without a hitch, you won’t notice any disruptions and everything should load as normal, although it will be loading from your new host!
How to Transfer Web Hosting From One Company to Another Review
- Transferring your website from one host to another is as simple as copying and moving the necessary files and making a couple other small changes.
- Begin by having a new hosting account started. I again recommend you do this at least a week before your old hosting lapses in case there are any issues so you have time to fix them.
- Backup and download your site’s compressed files and folders using “File Manager” in your old host’s cPanel. Do the same for your site’s database when applicable using “phpMyAdmin”.
- Create an Addon Domain for your website in your new host’s cPanel.
- Upload and extract the file with the files and folders in it to the empty folder in File Manager on your new host for your site.
- Create a database via “MySQL Databases” for your site if applicable and import the .sql file into it.
- Update your configuration file or files to reflect your new database information.
- Check on the php version of your site and create any email addresses you had associated with that domain on your old host.
- Point your nameservers to the new hosting account.
All in all it takes twenty minutes if you know what you’re doing and have everything ready, and just like that you know how to transfer web hosting from one company to another so you can repeat the same process for any other sites you had on that old hosting account you want to migrate.