I’ve created a few dozen websites over the last decade or so and have learned a thing or two about how to set up a website for free. Thankfully these days it’s never been easier to put together a beautiful, responsive website without either knowing anything about coding or spending a dime.
Now I’m going to cover everything you need to know on how to set up a website for free (even if you’ve never done it before in your life).
How to Set Up a Website for Free
Note that there are many different ways to set up a website. The method I recommend uses a free software called WordPress which makes setting up and running your website quick and simple. Best of all, no coding or technical knowledge is required.
Setting up a website for free is a simple 4 step process, so let’s go through them all one by one.
Step One – Register a Domain and Get Hosting
While setting up the website is free, you still have to pay for the domain itself and for it to be hosted (accessible) online. This is true regardless of what method you use to set up your website. Thankfully this will only take about 5 minutes if you follow these instructions, and all for less than the cost of a few lattes from Starbucks.
As an aside, when did we get into the habit of measuring the cost of everything in coffees from Starbucks? But I digress…
How to Register a Domain
First thing’s first, you need a domain. This is the URL which people will type in to their browser to visit your website. You can register a domain with a domain registrar like GoDaddy or Namecheap.

I personally prefer Namecheap because, as the name implies, their rates are among the most reasonable and they also give you free domain privacy protection.
Without domain privacy protection, people can freely see your name and home address associated with the website if they search for it. Many domain registrars charge for this, but Namecheap includes it at no extra charge.
Overall Namecheap provides the best value, with yearly registration fees of anywhere from 1 to 10 dollars on average (depending on the extension).
When you go to Namecheap, just type the URL you want to register into the search bar to see if it’s available and in what extensions. Examples of domain extensions are .COM, .NET, and so on.
.COM extensions are still the most popular and trusted extensions for a typical website, so I recommend registering that for your URL if it’s available.
How to Pick a Domain Name
The best domain names are shorter and more memorable, typically around 12 characters give or take.
It should reflect your niche or simply the name of your business if you already have one.
Obviously domains like Monster or GoDaddy have succeeded despite their seemingly random names, but I don’t recommend making things more difficult for yourself with an arbitrary name.
Does Domain Name Affect SEO?
There was a time earlier in the 2000’s where having your main keyword in your domain name helped you rank. Marketers began simply registering scooping up domains left and right for the keywords they wanted to rank for and put no quality into the content of the sites themselves.
Obviously this wasn’t good business for the search engines ranking these websites well. It got abused so much that search engines wised up and stopped counting that as a ranking factor.
Nowadays it’s a better idea to focus on choosing a name which people will remember and can easily type into their browser (hence a shorter name).
How to Host a Domain
Once you’ve got your domain registered, you need a place to store its files so that people can reach that website. This is your website’s host, which is the term for the server your website lives on.
Most domain registrars also offer hosting services, or you can use a unique host.
I host most of my websites on HostGator’s hosting. I have one single account which houses many of my websites.
I’ve used their services for over a decade and have always had a great experience.
How to Pick a Web Host
There are 4 main things to look for in a good web host:
- Reliability – By reliability, I mean the servers hosting your site should never be down. If the servers go down (which typically happens with cheaper hosts), your website is down. Not only does this look unprofessional but it can cost you rankings if your site is frequently inaccessible. Regardless, it WILL cost you traffic and potentially income.
- Speed – There are a lot of dirt cheap, fly by night hosting providers out there. Typically the area they lack the most is in speed. I’ve talked about how important site speed is to both users and search engines. While server speed is just one of many factors dictating site speed, it’s not a place to skimp.
- Features – There are a number of must have features which any reputable host offers. A couple essential ones are free email accounts for your hosted domains and free SSL certificates. Ease of use is another one. Most of the big hosts use a software called cPanel to interface with your hosting account. It’s very intuitive and easy to find what you’re looking for. I’ve used a couple hosts who DON’T use cPanel and their interfaces were a mess.
- Cost – You don’t need to pay out the nose for good hosting services. The dirt cheap hosting providers will cost you more in problems. And we’re only talking a difference of say $25 a year versus $12 a year.
I can recommend HostGator and Namecheap as both being reliable and affordable hosts. Both of these will cost just $2 (give or take, depending on the host) per month in your first couple of years.
How to Connect a Domain With Hosting
If you stay in-house, meaning you use Namecheap (for example) to register AND host your website, the process is much simpler.
If you use an outside hosting provider, you just need to specify to your domain registrar where your hosting is.
To do this, log into your domain registrar and find the domain you want. Select “manage” (in the case of Namecheap, for example).

In the manage section, you’ll see a section labeled “NAMESERVERS”.

Make sure the nameservers are set to “Custom DNS” and you’ll have two spaces to add nameservers.
You’ll get these from your hosting provider. You can find them either in the welcome email you got when you signed up for hosting, or in the account itself. In HostGator, it’s over on the right side of your account:

Plug these two servers into the section in your domain registrar and that’s it, you’re done! Note that it may take an hour or so before the connection is made and the site is accessible. While that might have seemed like a lot, it’s literally the work of 5 minutes.
Now it’s time to install the software to run our website.
Step Two – Set Up WordPress
WordPress is a free content management system.
In other words, it’s the software which runs your website. It’s very user friendly and very customizable to make attractive websites which work the way you want.
There are other content management systems out there, but WordPress is far and away the most popular and user friendly out there.
Before WordPress will work, we need to create a database on our hosting account. This is where any content we make on our website will be stored.
How to Create a Database in cPanel
It’s super easy to create a database in cPanel (the software for interacting with your hosting account). Just log into cPanel of your hosting account and navigate to the “DATABASES” section. Then select MySQL Databases:

This brings up a page where you can create databases, create users, and give those users access to those databases. We need to do those three things in that order.
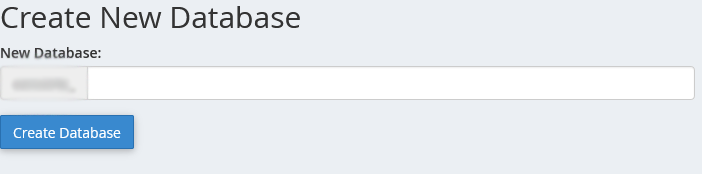
First, go to the “Create New Database” section and name your database. It doesn’t matter what you call this; no one will see it but you. Click “Create Database” once you’ve named it.
Next scroll down a bit to this section:
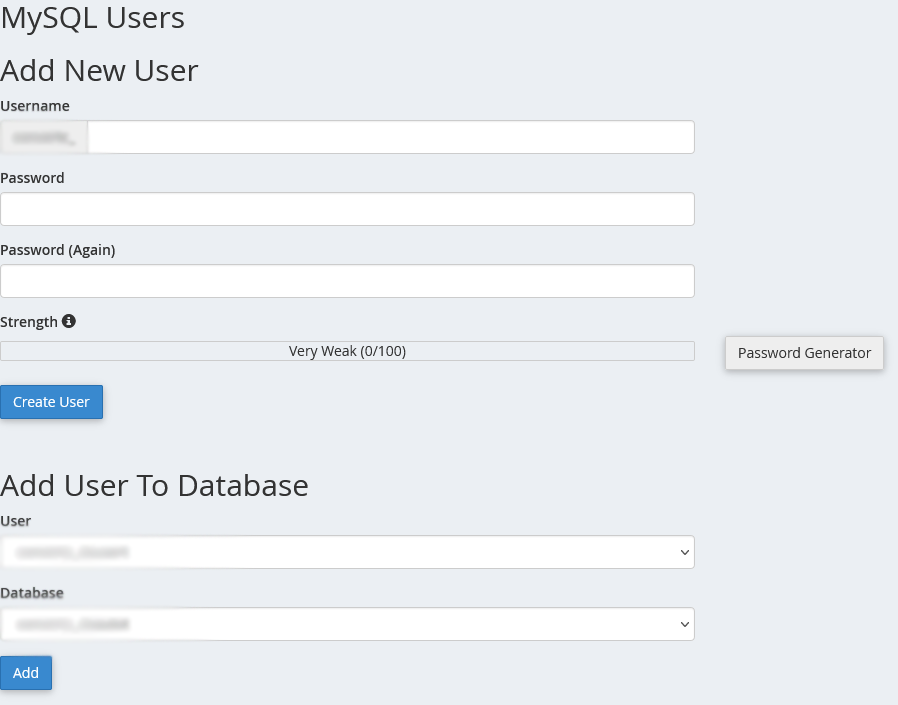
Now create a username. Again, it doesn’t matter what you name the user. Create a password for the user and click “Create User”.
Make sure to write down both the name of the database, the username, and password for the username. You’ll need these in a moment.
Lastly, select the new user you just created and add it to the database you just created in the section shown above using the drop-down lists.
Click “Add” and it will prompt you to specify what privileges that user has on the database. Select “All Privileges” and click “Make Changes” at the bottom and you’re done.
This will allow that user full control over the database which we’ll need to let WordPress function properly.
How to Install WordPress
Head over to https://wordpress.org/download/ and download the latest version of WordPress.

By default it will download as a compressed zip folder.
Now head back to cPanel on your hosting account again.
How to Create an Addon Domain in cPanel
If your domain registrar is different than your host, we need to create a folder on our hosting account to keep the files for our site (like WordPress).
If your registrar and host are the same, you can disregard this part as it will already exist.
To add a domain to our hosting account, in the “Domains” section in cPanel, select “Addon Domains”.
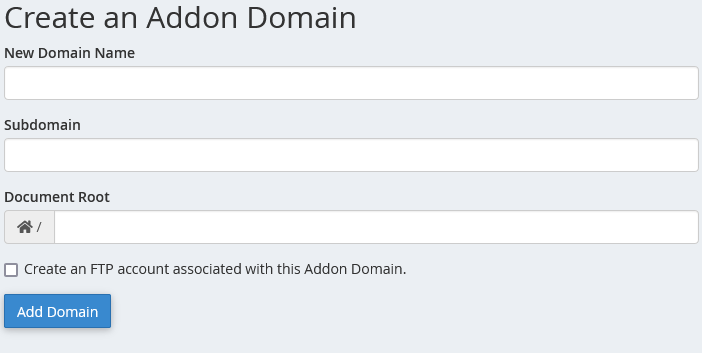
All you need to do here is fill in the “New Domain Name” field with your domain. If your domain is “example.com”, put that for example (without the quotes, obviously).
Click “Add Domain” and you’ll now have a folder for that domain.
Adding WordPress in File Manager
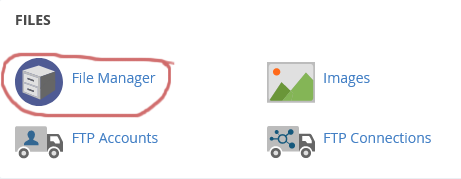
Now click on “File Manager” in the “FILES” section of cPanel. This is where all of the files are stored for your website. Note that this is not to be confused with the Database for your website which we created earlier which holds the data (like articles you’ll write) for your site.
Double click on the public_html folder, then find the folder named after your domain. This folder is the root directory of your website.
While in this directory, click “upload” and upload the zipped WordPress folder we just downloaded.
Once it’s uploaded, click “extract” on that folder in the root directory and select the root directory as the destination to extract the folder.
What this essentially does is copy all of WordPress’ files and folders to your site’s root directory. This will allow WordPress to run right from your domain.
Now that that’s done, the technical part is behind us. Congrats!
Now type your website’s URL into your browser.
If you did everything correctly, WordPress will greet you and begin the process to auto-install itself on your site.
Just go through the steps, filling in the required fields which should all be straightforward.
It will ask for your database name, username, and password for that user. Fill these out with the information you wrote down earlier when creating them.
At some point it will ask you to input your email address.
You could put an existing email address of yours, but wouldn’t it be more fun to use one with your domain in it?
How to Create an Email Address for Your Domain
Head back to cPanel one last time (I promise).
Navigate to the “Email” section and select “Email Accounts”.
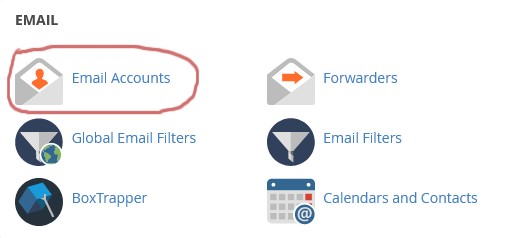
This will bring you to the page which has all of your email addresses associated with each domain you’ve created. Most hosts allow nearly unlimited email addresses for your domains.
I recommend creating one when you create your site because it looks much more professional and helps with branding.
Click “Create” then choose what name you want and select the domain you want to connect it to. Then create (and write down) a password for it. When finished, click “Create” and you’ve got your email address for your domain.
You can access your email through your cPanel anytime, or you can just add /webmail on to the end of your domain in your browser. Simply log in with your email address and password.
Back to the WordPress installation, enter this as your email address. Now anytime there’s a notification regarding your site, you’ll get emailed at that address.
WordPress will prompt you to enter a username and password as part of the installation. Note that this is unique to your database username and password.
This information will be used much more often, every time you log into your WordPress account.
It doesn’t matter what your username is, but note that unless you change your display name in the user section of your WordPress dashboard, your username is what will show as the author for any articles you write on your site.
Make sure your password is complex and uses a mix of uppercase and lowercase letters, symbols, and numbers. If someone cracks your password, they’ll have access to your website.
That’s pretty much it; WordPress will finish installing itself and will drop you into your WordPress Dashboard.
This is the central hub for your site every time you log in.
Step Three – Customize Your Site
You’ve done a lot of technical work in this process of how to set up a website for free. Once again, congrats on finishing it!
Now it’s time for the fun part where we actually customize our website in WordPress.
One of the best things about WordPress is how intuitive it is, starting with its dashboard.
WordPress Themes
You’ll find everything you need in your dashboard. Let’s begin by highlighting the “Appearance” tab and clicking on “Themes”.
The most important element which affects your website’s look and accessibility is its theme. There are thousands of free themes for WordPress along with thousands of premium ones, as well.
You’ll find that WordPress comes preloaded with one or two of its default “202X” themes. If we click “Add New” at the top, we’ll be taken to the free theme marketplace.
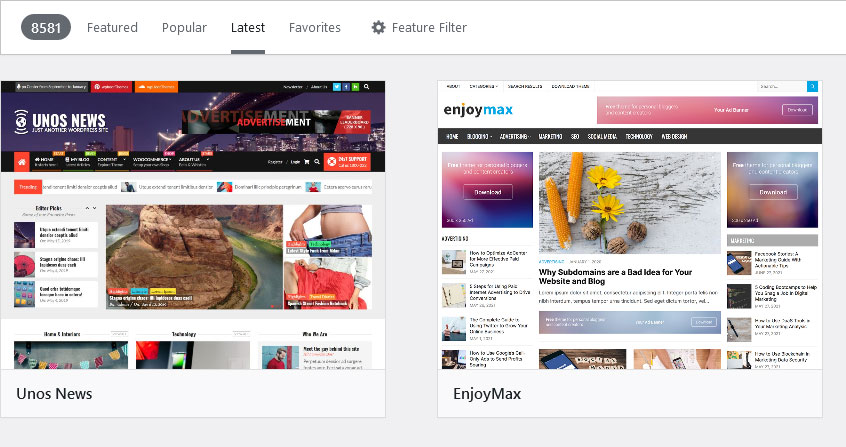
You can see that at the time of this tutorial on how to set up a website for free, there are nearly 10000 free themes accessible from within WordPress itself.
You can search by name, filter by feature, etc.
Typically you can’t go wrong by starting with clicking on the “Popular” tab. There’s a reason these themes in particular are used by thousands of websites.
They’re frequently updated, easy to use, and fast. Plus they’re so customizable that you shouldn’t worry about your website looking like any other one which uses it.
I’m working on an article on my pick for the best free WordPress theme, but again the most popular themes are a good place to start.
Note that installing and activating a theme literally takes two clicks from the theme marketplace.
Once you’ve installed a theme, select “Customize” in the “Appearance” tab.
This allows you to make simple aesthetic changes to your website’s look and see the changes in real time.
The options in the real time customize section will vary slightly from theme to theme. A few of the typical options include:
- Global – This lets you pick the main fonts and sizes for the characters on your website. This also lets you set basic site widths and overall color scheme for the various elements of your site.
- Header Builder – Pretty straightforward but this lets you upload a custom image (like your logo) to display at the top of your site. It also lets you set how the menu at the top of your website displays if you feature one. Most themes today let you create a unique header for both desktop as well as mobile devices for your site. This is important because your site will load differently on a smaller screen, so it’s important to take advantage of this feature.
- Default Layout – Here you can specify if you want your layout to feature a sidebar or not. A sidebar can be nice if you have static content you want on every page of your site like an email signup form, hours of your business, etc. Additionally, you can designate different parts of your website to display this differently. Maybe you don’t want a sidebar on your home page or you just want it on article pages. This can be specified here.
- Menus – Again, pretty straightforward but this lets you customize which menus appear where on your site.
- Footer – Like the header builder, but for your footer specifically. Some themes this just means displaying your copyright information.
WordPress Plugins
While you can achieve most looks and feels from your website through the theme, plugins can offer additional accessibility options.
These are free or premium apps essentially which give your site more functionality.
Select “Plugins” in your dashboard to see a list of your installed plugins.
By default, WordPress only comes with “Akismet Anti-Spam” which is helpful for auto removing spammy comments.
Just like with the themes tab, you can click “Add New” at the top of the plugins section to access a marketplace of thousands of free plugins.
I’ll be doing a dedicated tutorial on the must have plugins, but a few free plugins I recommend are for:
- Google Analytics for WordPress by MonsterInsights – This allows you to connect a free Google Analytics account to your WordPress website. Not only does it allow you to start tracking data, but it even displays it within your dashboard so you don’t have to leave your site to get traffic stats.
- Really Simple SSL – Many hosting providers like HostGator offer free SSL certificates. To get them to integrate with your site, you just need this free plugin. Just like that your website appears and is more secure to Google and your visitors. Simple (like the name suggests).
- W3 Total Cache – Caching plugins improve the efficiency of your site by reducing unnecessary loading. With free features for caching and speeding up your website in many other ways, W3 Total Cache is one of the best.
- Yoast SEO – This plugin simplifies on page SEO to ensure that every new page your create on your site is optimized for its keyword. I know you care about SEO otherwise you wouldn’t be here, so grab this one.
- Sucuri (or Wordfence) – These are all in one security solutions for your website. They prevent brute force password hack attempts, scan for malware, and do much more.
With these 5 areas addressed, you’ll be in great shape. And all without much more than a few clicks for each! That’s the beauty of WordPress.
One last thing to mention on plugins is I recommend that you set them to auto-update which you can do from the “Installed Plugins” section of your dashboard.
Outdated plugins are security liabilities and can cause site issues occasionally, as well. Setting them all to auto-update takes care of this for you.
Step Four – Add Content
The final step is adding some pages and articles/posts to your website.
Pages in WordPress are for static and the most important content of your site. A “Contact” section, “Hours”, “About”; these are all examples of things you’d make pages for. Menus are made of pages and are the types of content you want accessible from every web page on your site.
News updates, blog posts, and articles on the other hand; these are all examples of posts.
One thing I recommend before creating any posts or pages is to go to the “Settings” tab in your dashboard and select “Permalinks”. On that page, tick the “Post Name” box option. This makes it so that every page or post you create’s URL is its title.
Not only does this look better and is easier for navigation purposes, but this is the ideal format for SEO.
NOW, click on “Add New” under “Posts” or “Pages” in the dashboard to see how easy it is to create a new piece of content.
This will open the interface to create the post or page. It will prompt you to add a title, then underneath you can just start typing like a basic word processing interface.
With WordPress’ relatively new “block” interface, it’s very easy to make your content more dynamic.
While you can just add text, at any point simply click on the plus icon. This brings up a small interface where you can search through dozens of relevant blocks of content.
You can use these to add virtually any kind of content you can think of. Just type something to search for it. Examples of blocks you might add can be as diverse as an image, a table, a list (numbered or bullet), a Twitter URL, a YouTube video to embed right on your page, a star rating, and many more.
After you’ve created your page or post, you can preview it to see how it will look. You can even preview it in different formats, like desktop, mobile, or tablet. When you’re happy with what you’ve created, click “Publish”.
Congrats one last time, you’ve successfully complete this tutorial on how to set up a website for free.
It’s admittedly a lot if you’re new to the world of webmastering. Thankfully, once it’s all done, there’s nothing else to do outside of creating new content on your site.
Be sure to update WordPress and your theme when a new update becomes available as this keeps your site secure.
One final thing to mention which is fantastic about WordPress is that support is widely available for virtually any issue you experience. The forums are full of years of solutions to any problem you might come across.
Thank you for using this tutorial on how to set up a website for free, and let me know if you have any questions in the comments section below!
Pingback: How to Pick a WordPress Theme - Angry SEOer