An easy way to speed up your website without sacrificing any code or content is to add expires headers. WordPress users have a number of different ways to do this, from plugins to adding a simple line of code. Here’s a quick tutorial on how to add expires headers, WordPress edition.
Add Expires Headers – WordPress
Add Expires Headers WordPress Plugin
First, we have the simplest method of using a plugin. Before you reach for a dedicated plugin, know that one of the caching plugins you likely/should already have installed will do this for you.
This makes sense because expires headers is a caching rule.
It dictates to web browsers whether or not they need to load a page or a page’s elements fresh or if conversely they can access a previously cached version to save time.
Add Expires Headers W3 Total Cache
W3 Total Cache is a caching plugin designed to speed up your site in a variety of ways.
Adding expires headers keeps your site from forcing browsers to load static elements fresh every time needlessly. Instead, you dictate a period of time before these elements load fresh.
Install the plugin and navigate to the “Browser Cache” option in the dashboard. Different files are broken up by group where you can set their lifetime durations like in the image below:
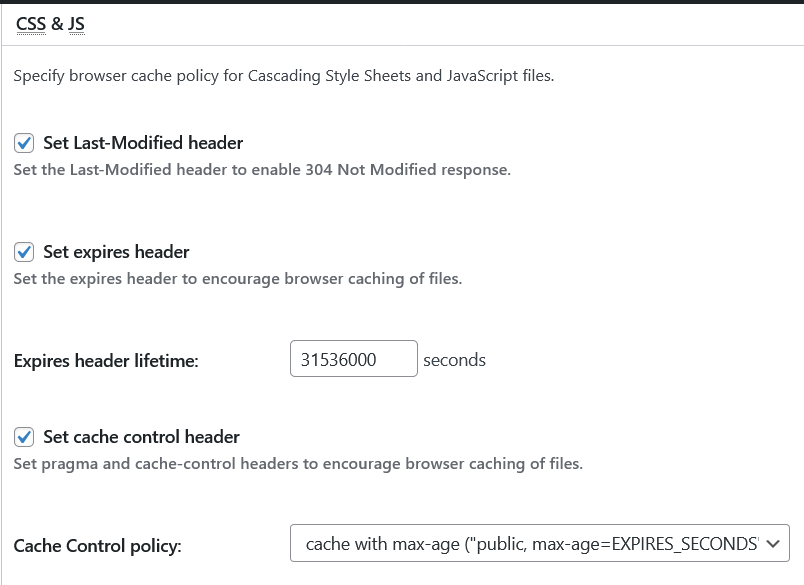
With these settings within the W3 Total Cache plugin, the CSS and JS elements on your site only refresh for someone who has visited your site after 31536000 seconds, or 365 days.
If someone revisits your site within that year, the browser will load more quickly because the CSS and JS elements have been cached in their browser.
Scrolling down the plugin, you can specify expiration terms for additional file types. Going with the default terms and settings is generally a safe option here if you’re not sure.
When you’re finished, simply click “Save Settings and Purge Caches” and you’re good to go.
Bear in mind that this plugin is automatically set up to add expires headers for your site by default.
How to Add Expires Headers in HTML
You can also add expires headers in WordPress without a plugin.
While not strictly HTML, it’s simple to do by adding one line of code to your .htaccess file.
Navigate to the root directory of your website and open up the .htaccess file.
Paste the following code to the bottom of the file:
<FilesMatch "(?i)^.*\.(ico|flv|jpg|jpeg|png|gif|js|css|woff)$">ExpiresActive OnExpiresDefault A2592000</FilesMatch>This dictates that your visitor’s browser to cache the listed file types (java, CSS, images, etc.) for the period of time listed.
In the above example, the length of time is in seconds, just like in the plugin examples above.
This translates to 30 days.
If the visitor returns to your site within that 30 day period, their browser will load the cached versions of the listed types of content. This ensures that your site loads much more quickly, providing a better user experience.
Once those 30 days are up, if the visitor returns to your site, those files will load fresh.
You can tweak that code to group whatever file types you want and specify various refresh times accordingly.
The above listed files are generally the types which don’t get updated frequently if ever, so a generous expire duration is suitable for them.
But there you go, plenty of ways to add expires headers, WordPress style! And don’t forget it’s also a great way to speed up your site for the core web vitals May 2021 update.